Tuesday, January 10, 2012

Townhouse living


We moved into our Westend townhouse in May 2009. We wanted to be in the Westend because many of our friends live here. It is ideal. All the major highways and freeways: Whitemud, Anthony Henday and Yellowhead are very close and also we have the West Edmonton Mall, Jamie Platz YMCA within a 5 minute drive.

It is an end unit with 3 bedrooms, 1.5 bathrooms with a finished basement. We have a tiny tiny yard. We just got sod last summer so this year is really the first time I can do something in the yard.

I think that you have to live in a place for a while and get the feeling for it. This is why I have just started to decorate it more. I do feel at home here and with the yard being done (which I hated before) I am content and happy to be here.

I guess the most important thing is, that we are not owning the place so everything I make I have to be able to take down. It can't be a permanent change because of course I don't want to repaint the whole place when we move out one day. The other thing is that I want to do it myself on a budget. Inspired by my fellow DIY and thrift store treasure hunter bloggers I will attempt to get the style I want for less...

My inspiration for our living space is the beach, ocean living, living in Hermosa Beach. Our family loves the ocean. I lived in California before I moved to Edmonton so the sound of the ocean, jack johnson on the radio are what I wold like to recreate here in Canada.

First up would be the living room I guess...

These are the two posters that I have. They are from Avery Tillmon (A lovely day and Low Tide )


 I have put these two pictures on canvas (see tutorial here).

Although I love the beach- and ocan-inspired living rooms I do want to keep it somewhat contemporary. Since we only have a small living room and eating area in one I have to be careful about the patterns in order not to overwhelm the place so little accents here and there is what I am looking for.

I found some living room ideas I liked

I live the black dining room set, looks a lot like ours

I would like to get a beige L- shaped sectional couch

I love the coral accents, beige and blue

Our wall gallery was inspired by this picture and check out the couch and chair accent pillows

Accent pillows... oh how I love them. My husband hates them, he says they are pointless but funnily enough I always catch him using one as back support on the couch - all squished up and wrinkled. That in turn I can stand!


To be continued.....

Love,
Karoline


Wednesday, January 4, 2012

"Boxing Week 2011 - Christmas Decor Haul"

What is the best thing about Christmas being over? To me it is the Christmas decor sale for Boxing Day/ Week. This year I found so many awesome, beautiful and super duper cheap things I will use next year.
Even though I have a very classic holiday style with gold, red and green I thought after seeing all the beautiful light blue decorations from my fellow bloggers I thought I need to get some stuff for next year.


My first buy: Aren't they cute? At the Westend Superstore I found these three little houses.The coolest thing about them is that they have little lights inside so you can turn a switch at the back and the windows light up and blink.

Original price was $9 each - I got them for $2.25 each (75% off)


I got these paper trees to go with the houses.
Original price was $7 (small) and $8 (medium) - i got them for $1.49 and $0.99.


All Christmas tree ornaments were 75% off too, so I got some light blue balls.


At Canadian Tire I got two little polar bear Christmas ornaments. All Christmas ornaments were 50% off! I thought they would go perfectly with my winter houses project for next winter (or this winter as we still have about 3 months of it ahead of us in Edmonton). One bear looks like he is trying to walk on ice (see his little paws all stretched out) - darn cute!!! The other one looks like he is ice-skating.


I thought how cute would it be if I make a winter landscape with these little houses and a little lake in front of it where these two little bears will ice-skate. I will start on it an keep you posted.

Polar bear ornaments - original price was $2 - I payed $1 each!!!

Also at Canadian Tire I found these 5 felt snow flakes. They were a buck each. Can't go wrong with that. I used them for a winter wreath project for our entrance door. I just took some wire and stuck it through the backside of the snowflakes and twisted it around a brach of the wreath that I got at Michael's during their last sale. Easy peasy - DONE.


Walmart had a ton of things on Sale. I got some turquoise Christmas balls that match the ones from Superstore and I got the last turquoise reindeer. It is so glittery. It will look awesome with the light blue and turquoise balls.


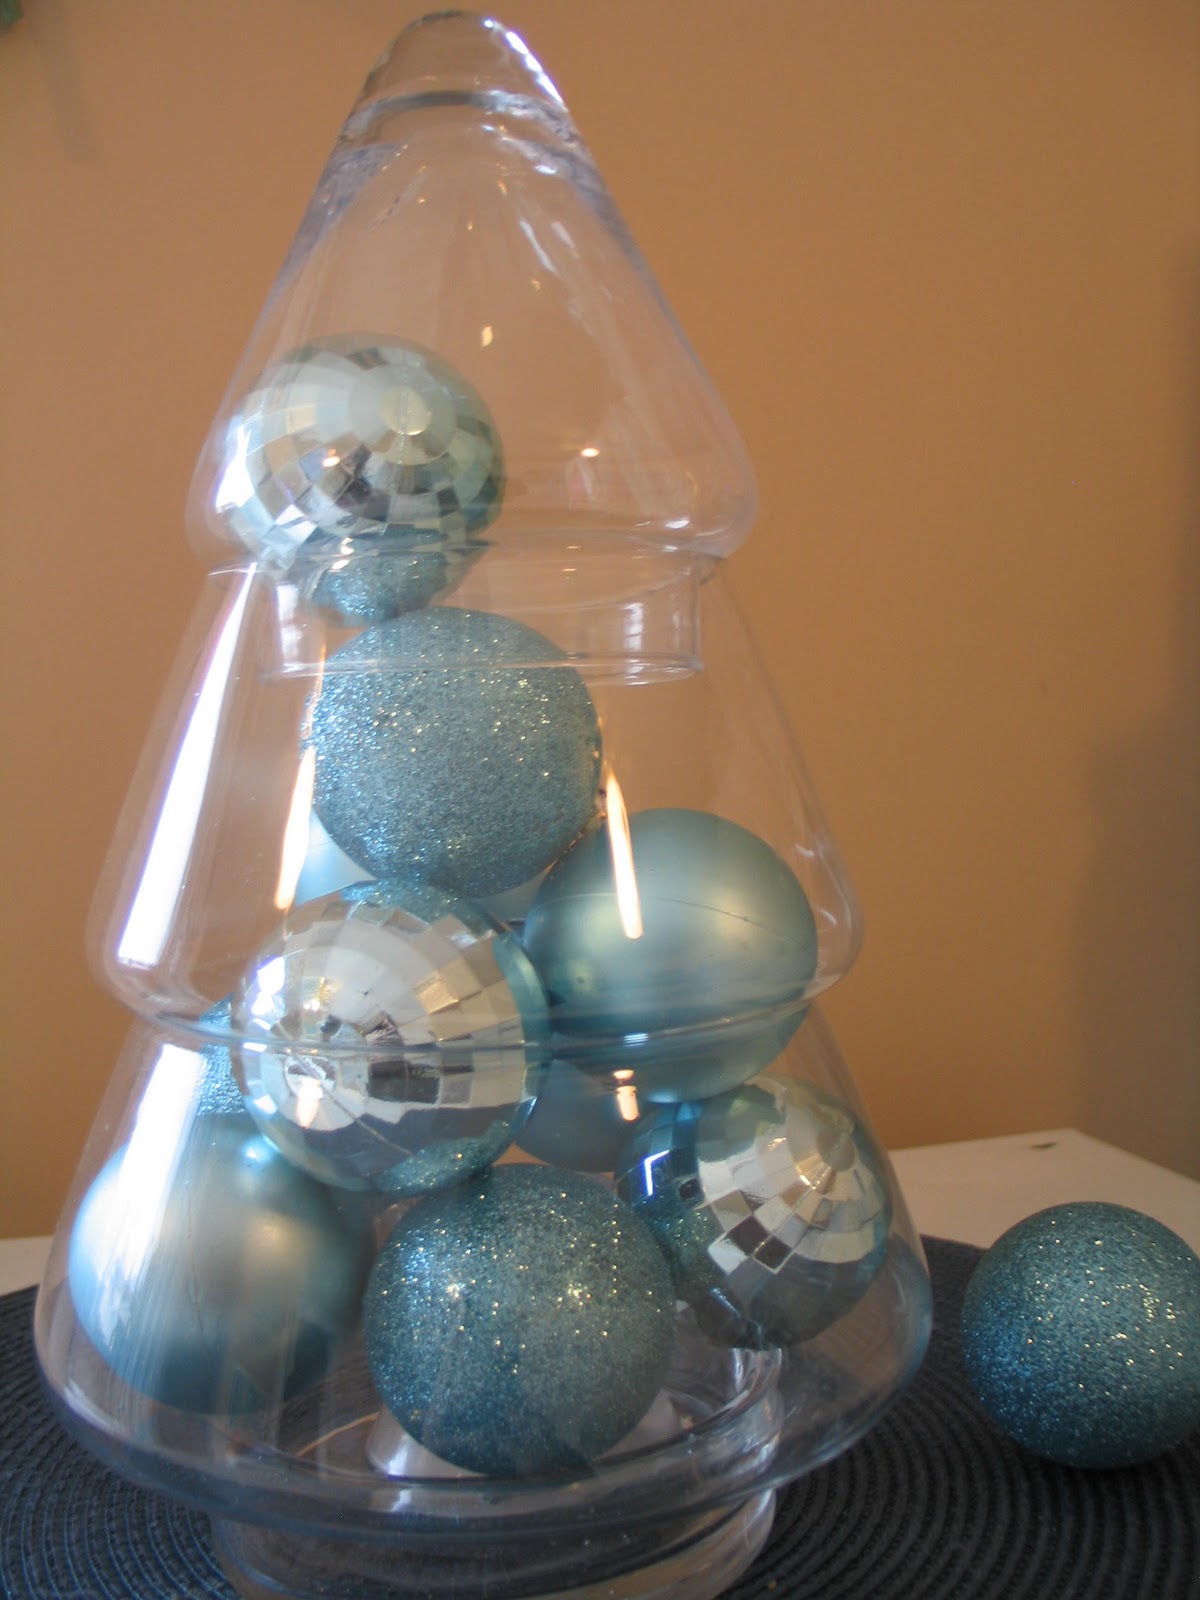
Then the best ever ever every, I saw these Christmas tree glass jars at Superstore. Guess how much they were - $2.49 each aaaaaahhhh. I could not believe it. I got three and I will probably fill them with some kind of decorations next Christmas. I can't wait!

Maybe like this...


This year the sales were amazing. It seems everybody tries to get rid of their Christmas stuff and you can get great deals if you have an open mind and an idea or at least a direction you want to go next Christmas.

What have you found on Boxing Day/ Week sale?!!?

Sunday, January 1, 2012

Happy New Year 2012!


After our donair and hawaiian pizza from Domino's, watching "Dinner for One" a German New Year's classic. We went to bed two minutes after midnight. Yup. Boring but I figured this would give us more engergy to start the new year with all the projects on my list.

My To Do list this year is long and I want to start on day one so that I really have the 365 days.

1. Starting my Dukan Diet adventure...
2. Finish all my little winter projects (birdcage restoration, Goodwill birds, bedroom decoration, Ikea chair slipcover for Gracie's room) so that I can start the bigger projects (redecorating our bedroom , redecorating Gracie's room, finishing the living room and all the new projects) in the spring and summer.
3. Start scrapbooking Gracie's pictures. She is two and I haven't even scrapbooked one picture yet.

I guess I have to make a detailed list but these are my creative/ and personal goals.

See ya...
Karoline

Thursday, December 22, 2011

Christmas Shopping - German Style


Christmas in Germany is different. Since I can remember we have done the same thing year after year. There is no meat on Christmas day so we start out with a fish brunch with smoked mackerel, herring in yogurt sauce, eel, shrimp salad, eggs and buns from the bakery.

For Christmas dinner we have some fish soup (from scratch) with baguette croutons, breaded karp fish, mashed potatoes and sauerkraut.

Since moving to Canada I have not really found the right Christmas meal to start a tradition with. I think that a turkey would be to much for our little family of three so we stuck to maple ham from Sobey's. It really is delicious and enough for two days.

This year I was lucky and got my friend Tatjana to be my motivator to take a trip to K&K Foodliner the German grocery store in Old Strathcona. She was kind enough to drive as our car has been fatally injured in an accidente and the West Edmonton Mall. When you enter you can already smell the fresh sausage and my little German heart starts to beat faster when I see all the goodies.

I tried to figure out what to buy for Christmas dinner on Sunday. I work until 3pm so not too much time to cook. I figured some Spaetzle with gravy would be nice and some ground beef (hunter style) with fresh mushrooms and red bell peppers. I think that sounds great.


My loot from left: Gluehwein (without alcohol), Spaetzle (egg noodles), Spekulatius cookies, Sweet-sour Chinese soup and the seasoning for my ground beef.

and my homage to our family brunch - Herring Salad!

After K&K we stopped at the Artistic Bakery on Calgary Trail. Seriously, they have the REAL German bread and cakes, cookies, pastries whatever your heart desires. I got some bread and some cake. Christmas shopping accomplished.


Kaesekuchen (Cheesecake) and Donauwelle (Vanilla cream cake with cherries and chocolate)

I will have a post about my Christmas dinner. For now, happy Christmas preparations...

Karolne

Sunday, December 4, 2011

How to create a faux painting from posters


I have this one poster that I love. It is a print of a painting by Avery Tillmon. I always loved it and I got in at Michael's on sale a while back. I had it framed but I always wanted to make it into a "fake" painting. One day when I was at Michael's they had the other other part "A day at the sea" on sale for $5. In the course of the redecoration of the living room I was only waiting for a sale on canvasses so I can turn my posters into masterpieces. Well, that day came. I got the - BUY ONE - GET ONE FOR A CENT - I payed 27.99 for two 22x28.


This is what I used!

1. Posters
2. Canvas (nothing fancy just a regular one)
3. Gesso (you can get it at the oil paint section at Michael's)
4. Mod Podge (I used shiny finish)
5. Foam roller from the dollar store
6. Glue
7. Paint brushes
8. Acrylic paint (I had to touch up the painting)

1. First I covered the entire canvas in mod podge with a foam roller.


2. I laid the poster onto the canvas and made sure I had no creases or air bubbles. I turned the canvas poster down on the floor and used my hands to work from the inside out so minimize air bubbles and creases.

3. I covered the painting in gesso with the foam roller. At that stage I had a LOT of bubbles and creases I was not impressed so I pulled the wet and sticky poster off the canvass and laied it back on. This seemed to help a bit but it wasn't perfect.


4. I put a layer of mod podge on the gesso and waited for it to dry a bit and then just gently pushed down on the air bubbles. You have to wait until the mod podge is not too sticky to the touch because if you touch the poster the poster will stick to your fingers and it will get a white spot. That happened to me in a couple of places.

5. After that you have to fold the edges of the poster over (if the poster is bigger than the canvas) and glue it down with glue. Make sure apply another coat of mod podge on the edges and canvas so it really sticks in place.

6. Once you have taken out the air bubbles and let the layer on mod podge dry you can apply another layer of mod podge.


7.  In order to get the "painting" look you can use a regular paint brush, use a little more of the mod podge to give it some dimension and paint like the artist would have on the painting. Clouds, people, sky: make sure you can see the brush strokes. LET DRY.

8.  To get even more dimension you can use some regular glue and apply it in the same matter. In my case I have painted the clouds, mountains, dog and people with glue to make it stand out more. Make sure you use glue that will dry clear.


9.  So now I had to fix the white spots where the poster came off. I used my acrylic paint to blend the colors as closely as possible to the original and then just painted it in.

10.  At the end I applied a couple of coats of mod podge so that the whole painting had a uniform gloss to it.

It took me about 2.5 hours of work (+ drying time in between)

I WOULD RECOMMEND TO ONLY USE MOD PODGE OR ANY OTHER DECOUPAGING GLUE. I AM NOT SURE WHY I READ I SHOULD USE THE GESSO. IT WAS QUITE EXPENSIVE AND NOT NECESSARY IN MY OPINION.

 I think for my first try it looks great. I think our sad eating area has the right beach feel now.


You can see the "brush stokes" created with the glue and mod podge

Thursday, December 1, 2011

X-MAS Advent Calendar DIY - Reusable and easy to make


December 1st, Christmas has officially begun! Yay!

I saw this tea wreath idea by kojo design and instantly loved it. Since there was room for 24 tea bags I thought how great it would be to make an advent calendar. In Germany Christmas is actually on the 24th so there are 24 doors in the advent calendar.

It is a very easy DIY project and if you give it away it is a reusable gift that can be enjoyed every year again!

All you need is this:

1. Designer Paper (One 12x12 and maybe some other coordinating paper scraps)
2. Cardboard (I used a diaper box)
3. Cloth pins
4. Glue
5. Ribbon for hanging
6. Stampin' Up! ink for distressing


1. First you have to use a plate or some other round object to trace the circle. I used an approximately 10 inch plate and a bowl for the inner circle. You have to make sure, that the wreath is wide enough for the cloth pins as you don't want them to stick out from the sides.


2. Trace the circles on your designer paper and then add some little tabs about 1 1/2 inch from the edge of the traced circle. I am sure you can find a different way to do this but this was how I did.


3. Next, cover the clothes pins in the designer paper or card stock you have selected.


I used regular glue instead of hot glue like in the other tutorials. I found that the hot glue made some lumps and just didn't look good.


 I spread it out evenly on the clothes pin.


4. Glue the card board circle to the designer paper.


5. Put dabs of glue on the notches and glue them down.


6. Depending on what kind of a look you are going for you can distress the wreath edges as well as  clothes pins with ink and a sponge.

 7. Space the clothes pins evenly and glue them to the wreath.


8. Attach a ribbon (I glued it to the back of the wreath).


Have a wonderful Advent!

Karoline
Related Posts Plugin for WordPress, Blogger...